The Story of the Pearl Coat

DSCN2099

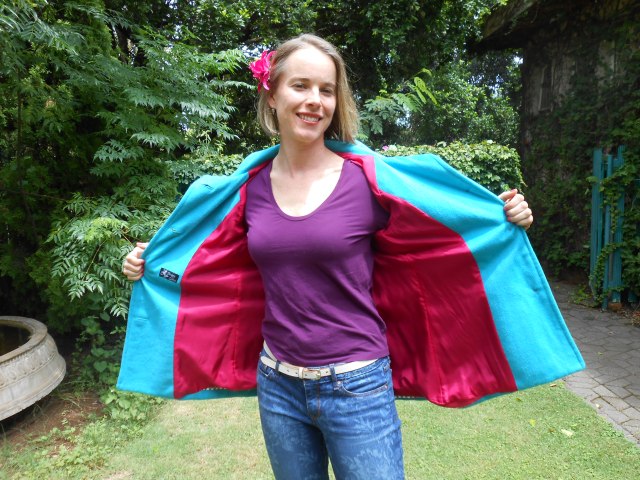
I made this coat a while ago for my sister as a birthday present.  I found a pattern that I liked in the Simplicity 2508 Project Runway pattern and bought a gorgeous turquoise wool/cashmere outer fabric and magenta silk lining from Tessuti.  It was a VERY ambitious project and probably the most expensive thing I have ever made given the amount and cost of the fabrics.  With my sister and I living on opposite sides of the world, I made a toile and sent it over to her for comment.  She said “It’s great!” – which was not entirely helpful but kept me going.

pattern and button

I put the whole thing together and made a few mistakes along the way – mistakes that seem so obvious now that I’ve made my Ziggi.  But I managed to fix most of the errors – some of which required nifty use of bias binding and ‘feature’ fabric in the lining but it all turned out ok. To finish it off, I found these beautiful buttons at Buttons Buttons Buttons here in Sydney – what a treasure trove for button lovers!  I was pretty proud of the end result and delivered it to  my sister with pride on a holiday in mid-summer so the coat didn’t venture out for another 6 months.

When Dahling Sister did finally wear it, she said it was lovely and she got nice compliments from friends.  But I still wasn’t convinced because I hadn’t seen any real evidence of her in the coat.  On another visit to see her (again in hot, non-coat weather), I asked her to try it on for me and I was horrified to see that it didn’t fit properly at all. It was way too big and the shoulders just looked silly.  It looked like she was borrowing her big sister’s coat…which I guess she was.  So I promptly told her she couldn’t have it any more and I took it back so that I could get some wear out of it.  She did agree that it was for the best because the fun-lovin’ Pearl coat just wasn’t getting out enough. So back to Sydney it came (well travelled coat!) and now with the cold weather we’ve been having, I’ve been getting a lot of wear out of her!

coat detailsI’m sad that my DS didn’t get her birthday coat, but very happy that I now have a new winter coat and that the Pearl coat gets her day in the sun…or cold as the case may be.

Now that I’m wearing the coat I’m also noticing other errors that are clearly beginner mistakes. But I suppose there’s no better way of learning than just going for it!  For example the sleeve tabs are going the wrong way – they should be going over the sleeve not under the sleeve. This is an easy fix with the move of the a button.  I also don’t like how the hem turned out and wonder if my catch stitching on the inside wasn’t quite up to scratch.

But on the whole I’m pretty proud of this coat – my first outer wear garment, first attempt with thick woollen fabric and my first fully lined coat or jacket. She’ll get lots of wear if the weather stays cold like this and I’ve definitely learned lots for my next coat.

Pearl coat inside

The inside…you can see a sliver of the ‘feature’ fabric (aka ‘fixing a boo-boo’ fabric) along the bottom.
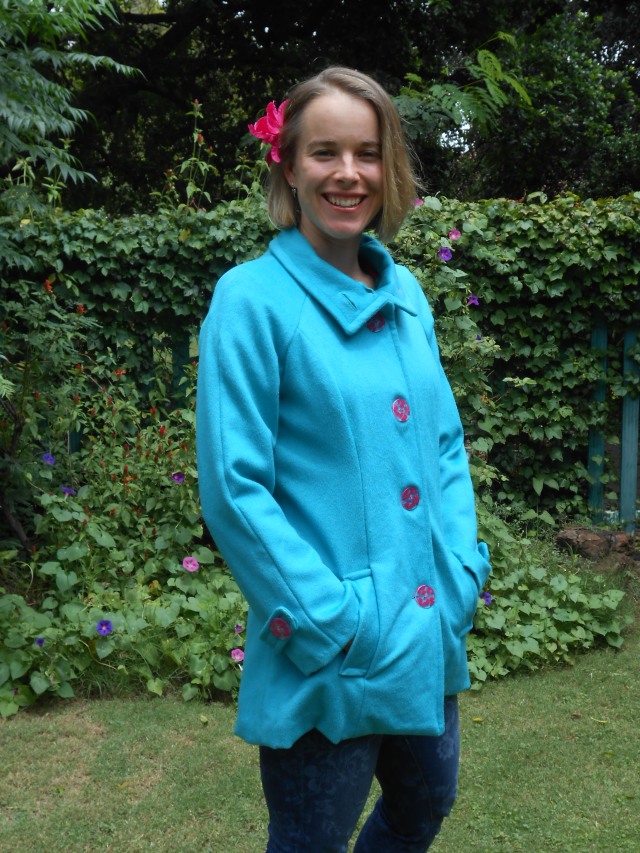
Pearl coat 1I quite like the raglan sleeves and square collar.

Pearl coat collar

Pattern: Simplicity 2508. I chose the square collar and a length that just covers my butt.

Fabric: Turquoise wool/cashmere blend and magenta silk lining from Tessuti.

Alterations: None planned but a few ‘fix-it’ alterations

Do it again: I’m not going to rush into making another although I do like the pattern.  I think my next coat should be something different.

Thanks for stopping by and I’d love to hear from you.

Stretchy Sewing: My First Renfrew

Renfrew front

I have seen Sewaholic’s Renfrew all over the blogging world for a while now and finally succumbed to trying it out myself.  Part of me felt that with my new found pattern-making ‘skills’ I should be able to put together a decent stretch top pattern and so resisted the temptation to buy stretch patterns for a while.  But then I tried the Renfrew.  And what bliss.  The notches line up.  The cuffs and waist band and neck bands all fit together well and it all came together really quickly.  Nice work Sewaholic!  The most frustrating thing about the project was painstakingly sticking all the print-at-home bits of paper together and that was totally my fault for being too impatient to wait for a pattern to arrive in the mail.  I really liked the choice of cuffs and waist band to finish off the sleeves and bottom because those details are still the downfall of my stretch garments.  I just can’t get them to look fabulous. But with a nice cuff/waistband, I’m one step closer.

Renfrew back

(The back seam of the cowl looks like it’s off centre in this pic but it’s just the way it’s sitting here – really it’s not like that!)

I cut a size 10 based on my bust measurement but I feel that it might be a bit big.  I might try a size smaller next time and have considered giving it a bit of shaping at the waist.  But this loose comfy fit also works well.  I tried view C complete with gorgeous full cowl neck and three-quarter sleeves.  I think next time I’ll go for long sleeves because if it’s too cold for short sleeves, I’m all bundled up and if it’s too hot for long sleeves I want short sleeves!  So I never really know where three-quarter sleeves fit in.

The other awesome thing about this top is I did it ALL on the ‘Old Babe’ Overlocker!  I am in love.  Serging up a storm! This is just the start of the storm ‘serge’! I probably should’ve done some top stitching to keep the seams lying flat but I loved how quick and easy and NEAT it was to whip up a garment on the overlocker.  I know the pro’s among you would be horrified to hear that I used mainly black thread but it was all an experiment to see how my first overlocker garment would turn out.  And I think it turned out pretty well.  I might be pre-empting disaster here…but it looks like with an overlocker you can get away with all manner of sins …in terms of thread colour any way.  Don’t worry…I will change colour when I need to do a light coloured piece 🙂

Pattern: Sewaholic’s Renfrew

Fabric: Cotton knit in a greeny/aqua colour from a Marrickville fabric store

Alterations: None

Do it again: Absolutely! Maybe a size smaller, long sleeves.  Might try it as a dress or even mix it up with a bow like Amy’s version from Sew Well.

Do you have any serger secrets to share?  What did you learn from your Renfrew or what variations have you tried?


A Sorbetto Top for Mom

Sorbetto mom2

Earlier this year when I was visiting my mom, I was itching to sew so I raided her (very meagre) fabric stash.  I found a skirt that she had bought because she liked the fabric but it had been folded up too long in the store and had ripped along a fold line on the first wear.  She had been saving in the hopes of fixing it.  But I took one look at it and said “No, way!  It wants to be a top.”  I printed off Colette’s Sorbetto pattern and away I went.

I cut a size that matched my mom’s bust measurements and added a bit of length as I had found mine too short and sewed it up. I had just enough fabric to get it in.  I left in a bit of a hurry so I left my mom with the job of hemming it – but she did a stellar job and look at the great result! I’m pretty chuffed with the repurposing of a skirt that was destined for the bin.  Now she just needs some warm weather so she can wear it.

Pattern: Sorbetto by Colete Patterns

Fabric: Repurposed skirt made of a lightweight floral polyester blend

Alterations: Added some length to the top

Do it again?: I think there’s always room for another Sorbetto…when summer comes around again


Sewist Generosity and Serging up a Storm

I am continually in awe of the generosity of the sewists around me – physically and cyber’ly.  One of the reasons I wanted to start this blog was to try to give a little back.  (I’m still working on that…).  Most recently, the lovely and talented Lesley (whom I met through pattern making class) heard my plight of pining for an overlocker…and lent me her ‘Old Babe’ Babylock Overlocker!  The Old Babe has been sitting in the cupboard waiting for Lesley’s Dear Daughter to take a keen interest in sewing while a newer model gets primary affections.  But not any more…I was so excited by Lesley’s offer that of course I jumped at the opportunity and raced off to collect it thinking that I’d start serging up a storm immediately.

DSCN2612

The storm was slow to start however as I quickly learned that overlocking requires a new set of toys…and skills.  So I went and bought four large reels of thread in colours matching the threading diagrams…and then again in black and beige when I realised there are few projects where red, yellow, green and blue will blend in ‘seamlessly’.  I also got long nosed tweezers for threading and most importantly I purchased the Craftsy class Beginning Serging by Amy Alan.  It is a great introduction but then also gives you a whole range of different stitch types and a few projects to get confident on.  Amy is a very good teacher and I’m so impressed that she gives personalised feedback to queries by so many halfwits like me who can’t get pretty overlocked seams.

Equipped with new bits and pieces, hours worth of video tutorials and more enthusiasm than sense, I began my journey into overlocking.  The beginning was a challenge and I spent many an hour (and hundreds of scraps of fabric) trying to figure out the tension thing.  I know this is what master overlockers always say…and they are right:  Getting the tension right for each stitch type for each fabric is no walk in the park.  But with some perserverance and helpful hints from the brilliant Amy Alan, I managed to overcome the tension hurdle and get a decent stitch.  I think the key factor was using woolly nylon in the lower looper…which Lesley had suggested RIGHT in the beginning but I was starting with all elements the same and going from there…just to be stubborn.

DSCN2611So now that I’ve got a good looking stitch I’m so excited to get going on some projects.  Even too excited to learn the other stitches (like rolled hems) just yet.

The Serging Storm has begun!  Thank you, Lesley!