Renfrew Maternity Hack in floral

Our exciting (read: overwhelming, a little scary and physically uncomfortable right now) news is that we are welcoming another member to our family…any day now!

Besides the mental preparation, financial and logistical considerations and general nesting, what it has also meant is that I’ve had zero clothes to wear especially since my first pregnancy was during a very hot Sydney summer and this one was mainly through winter.  I have borrowed most of my wardrobe and bought some key pieces but, of course, couldn’t really justify spending much money on clothes I’d only wear for a few months when I have piles of fabric that are aching to be made into something wearable.

img_1563

First up:  The Floral Renfew Maternity Hack.  I love this pattern from Sewaholic and have made a few versions that have been well loved.  I decided that this was as good a place to start as any.  I then did a bit of research on how to adjust a pattern for maternity.  There are differing schools of thought on this one and the clearest tutorials I could find were from Melly Sews.  She provides two options with the first probably better for a more flowing style and the second option I decided would suit the Renfrew better and work well with the waist band under my belly.

The fabric I chose is a nice light-weight cotton knit I had left over from my Beach Dress.  It’s a fun floral and although probably more suited to summer clothes, worked well for this in-between season top.  I chose the three-quarter sleeves from the Renfrew pattern which means the top can swing to the warmer or cooler side depending on what’s needed.  Versatility – woohoo!

I followed Melly’s steps and caught the main gist but my pieces didn’t quite line up like they were supposed to.

Any way, I made it work and then set about cutting it out and sewing it up.  Once again, with the help of my trusty old lady overlocker, this came together pretty easily.

img_1560

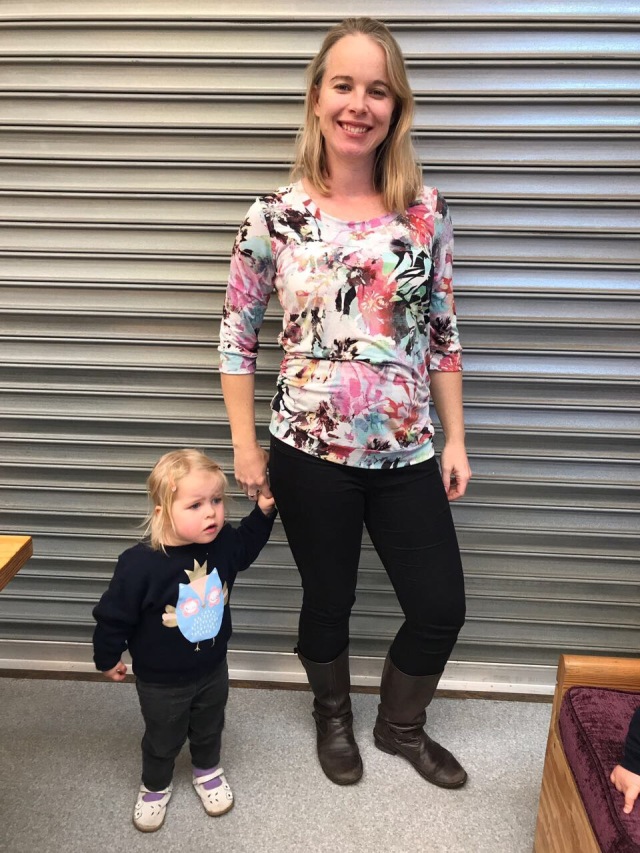
I reinforced the shoulder seams with swimsuit elastic.  I also added rouching in the side seams so that the extra length of the t-shirt is taken up on the sides but sufficient to get over the ever-growing belly.  I created the rouching by just stretching elastic through the lower portion of the side seam and letting the elastic create the rouche. This is probably the lazy way of doing it and really you should sew channels along the side seams and then thread a long tie of fabric through the channels so you can gather as little or as much as you want.  I also should have measured the stretch of the elastic a bit better because the sides aren’t 100% even.  Oops!

This has been a great go-to top during my pregnancy and even now at 38 weeks I can JUST fit into it!  But phew…I’m ready for baby to arrive now!

FullSizeRender (2)

Pattern: Sewaholic’s Renfrew adapted for maternity thanks to Melly Sews

Fabric: Lightweight floral cotton knit originally from a fabric store in Marrickville, Sydney

Alterations: Maternity adaptions to the pattern plus side rouching

Do it again: Always room for another Renfrew… Not another maternity one though!

Super Snug Sleep Sacks

When we first arrived in Cape Town from Sydney I was reminded that June in Cape Town is COLD.  My little bunnies were freezing in their camp cots on the ground and they were quickly getting too big for their sleeping bags. So, of course, the solution is not to go out and buy a replacement but rather make new sleep sacks. (Why do we do this to ourselves?!).

fullsizerender_4

Armed with my mom’s ancient, but immensely reliable, Elna Lotus sewing machine and a bit of internet research I started the process of making sleep sacks. I checked out DIY Mommy’s cute fleece version  and Small Dream factory’s instructions as well as measuring off our existing sleep sacks and scaling them to bigger sizes thanks to this chart that I can’t seem to find the original source to.

Image result for baby sleeping bag pattern

For the one, I chose a fun orange ladybird cotton and a yellow monkey/cupcake flannel for the lining and the other one is a purple dog print on the outside and blue farm animal flannel on the inside.  I spent quite a bit of time looking for the right batting. I really wanted organic cotton but it’s really hard to find.  And I really didn’t want synthetic but that’s the most common batting around.  Eventually I settled for a pure, rough, wool which at first I thought was a bit dirty and not pristine enough for my babies, but as I got to know the material better I started to love the bits of Karoo bush and tiny twigs mixed in with the wool.  I imagined the happy, free-roaming sheep gladly giving up their winter coats and was pretty certain that no chemicals or major factory processes went into the making of the wool batting.

I drafted the pattern and from the beginning wanted a zip on the side to avoid zips scratching little chins and necks. I cut out the fabric for the first sleep sack and after consulting with hubby (my design consultant), we decided the neckline and arm holes looked too small. So I made cut them a bit bigger.  But…we wrong…after I made up the sleeping bag and tried it on a munchkin, we realised that the neckline and arm holes were now too big!  So for sleep sack number 2 we went back to my original design. And now we have one that’s a little looser than the other.

Sewing the sleeping bags wasn’t the easiest task mainly because of the batting.  I first sewed the batting onto the lining with parallel stitch lines and quickly realised that I needed another layer of fabric between the outer and the batting to stop ‘threads’ poking through the outer layer and also to help with the sewing. Next I sewed in the zip, turned it all the right way around and then finally added biased binding along the top edges of the sleep sack.  The very final step only took place about 3 months later (ie a few days ago) when I added the snaps into the shoulder straps. Until then I just used safety pins which worked ok but I much prefer the snaps!

I am pretty happy with how they turned out and they have definitely worked in keeping the girls snug in winter.  I am also much happier with the snaps that the dodgy safety pins.  Now with summer well on its way, I’ll have to think about making some cooler ones for warm summer nights!  It’s never over is it?

img_9104

And the twincesses FINALLY have their proper cots back and are out of their travel cots after 3 and a half months of waiting for our shipment to arrive!

Pattern: My own Sleep Sack pattern based on internet research and existing sleep sacks

Fabric: Printed cotton outer, lightweight cotton inner liner, pure wool batting, cotton flannel lining, zip and hand made complementary bias binding

Alterations: On the orange one I made the neckline and armholes bigger…mistake.  Stick to the pattern!

Do it again: I might have to make summer ones next!

Ms C’s Bird Chair

DSCN1085

Friends of ours recently moved into a beautiful flat near us and did a fantastic job kitting it out with an ecclectic mix of fabulous pieces gathered from from the wonderful world of eBay. This exercise included the purchase of a piano for which the cost of moving and tuning it was more than the piano itself – but how fun to have a piano in your home?!  Some of the pieces of furniture were bought for their innate potential rather than the faded ‘granny’ fabric that first met the eye.  And this is where I came in.

I was asked to help with the home-making project by covering the cushions for one of the chairs in a fun bird fabric that Ms C had found at Ikea. Of course I was delighted at being asked and embraced the challenge. The first task was to pull apart the old covers to make a pattern for the new cushions.  I also managed to salvage the zip and had considered saving the piping cord but this was rather damaged and I found that buying piping cord was a pretty simple exercise:  You can get varying thicknesses from Lincraft.

DSCN1077I painstakingly made meters and meters of bias binding to turn into piping for the edges of the cushions.  And carefully laid and cut out the pattern pieces to have a good selection of birds in the right places on the cushions.

DSCN1080Although I had bought the correct needles, piping foot and extra strong upholstery thread (I was advised to only use it as the top thread – keep the bobbin with normal weight thread), my machine was NOT enjoying sewing through the piping and the two layers of fabric to construct the cushion. I tried many different iterations but I think I may have been asking a bit much from my dear old lady sewing machine – she’s probably older than I am so deserves some respect.

DSCN1076  DSCN1075

I ended up putting the top cushion together without the piping, while for some reason the bottom cushion worked fine with the piping. But when I took them over and saw the cushions together on the chair, I wasn’t happy. They needed piping for that professional finish.

The key, I discovered, was to get the right zipper foot.  So I searched the online and offline shops, bought two incorrect feet and finally found a zip foot that worked. And eventually, I got my the piping finish I wanted!  I was pretty happy with how the cushions turned out in the end and even happier at seeing how proud Ms C was of her newly refurbished chair in her beautiful apartment.

Chair_cropped

DSCN1074Do you have any tips for sewing upholstery on a domestic machine? At the moment I feel like I’m just trying things out by trial and error.